> ## Documentation Index
> Fetch the complete documentation index at: https://docs.htflow.com/llms.txt
> Use this file to discover all available pages before exploring further.
# Cursor Extension
> Install and use HTFlow extension in Cursor
## Overview
The HTFlow Cursor extension provides a visual interface for all HTFlow CLI commands, making it easy to manage HTFlow projects without touching the terminal.
Works with both **Cursor** and compatible forks
## Prerequisites
Before installing the HTFlow extension:
Download from [cursor.sh](https://cursor.sh/)
Required for HTFlow CLI Download from [nodejs.org](https://nodejs.org/)
## Installation
### Step 1: Open Cursor
Launch Cursor on your computer
### Step 2: Open Extensions Panel
Press `Ctrl+Shift+X` (Windows/Linux) or `Cmd+Shift+X` (Mac)
You can also click the Extensions icon in the Activity Bar
### Step 3: Search for HTFlow
In the search bar, type **"Htflow Html to Webflow"**
### Step 4: Install Extension
Click the **Install** button next to the HTFlow extension
### Step 5: Reload Cursor
Reload Cursor to activate the extension
HTFlow icon should appear in the Activity Bar
## How HTFlow Cursor Extension Works
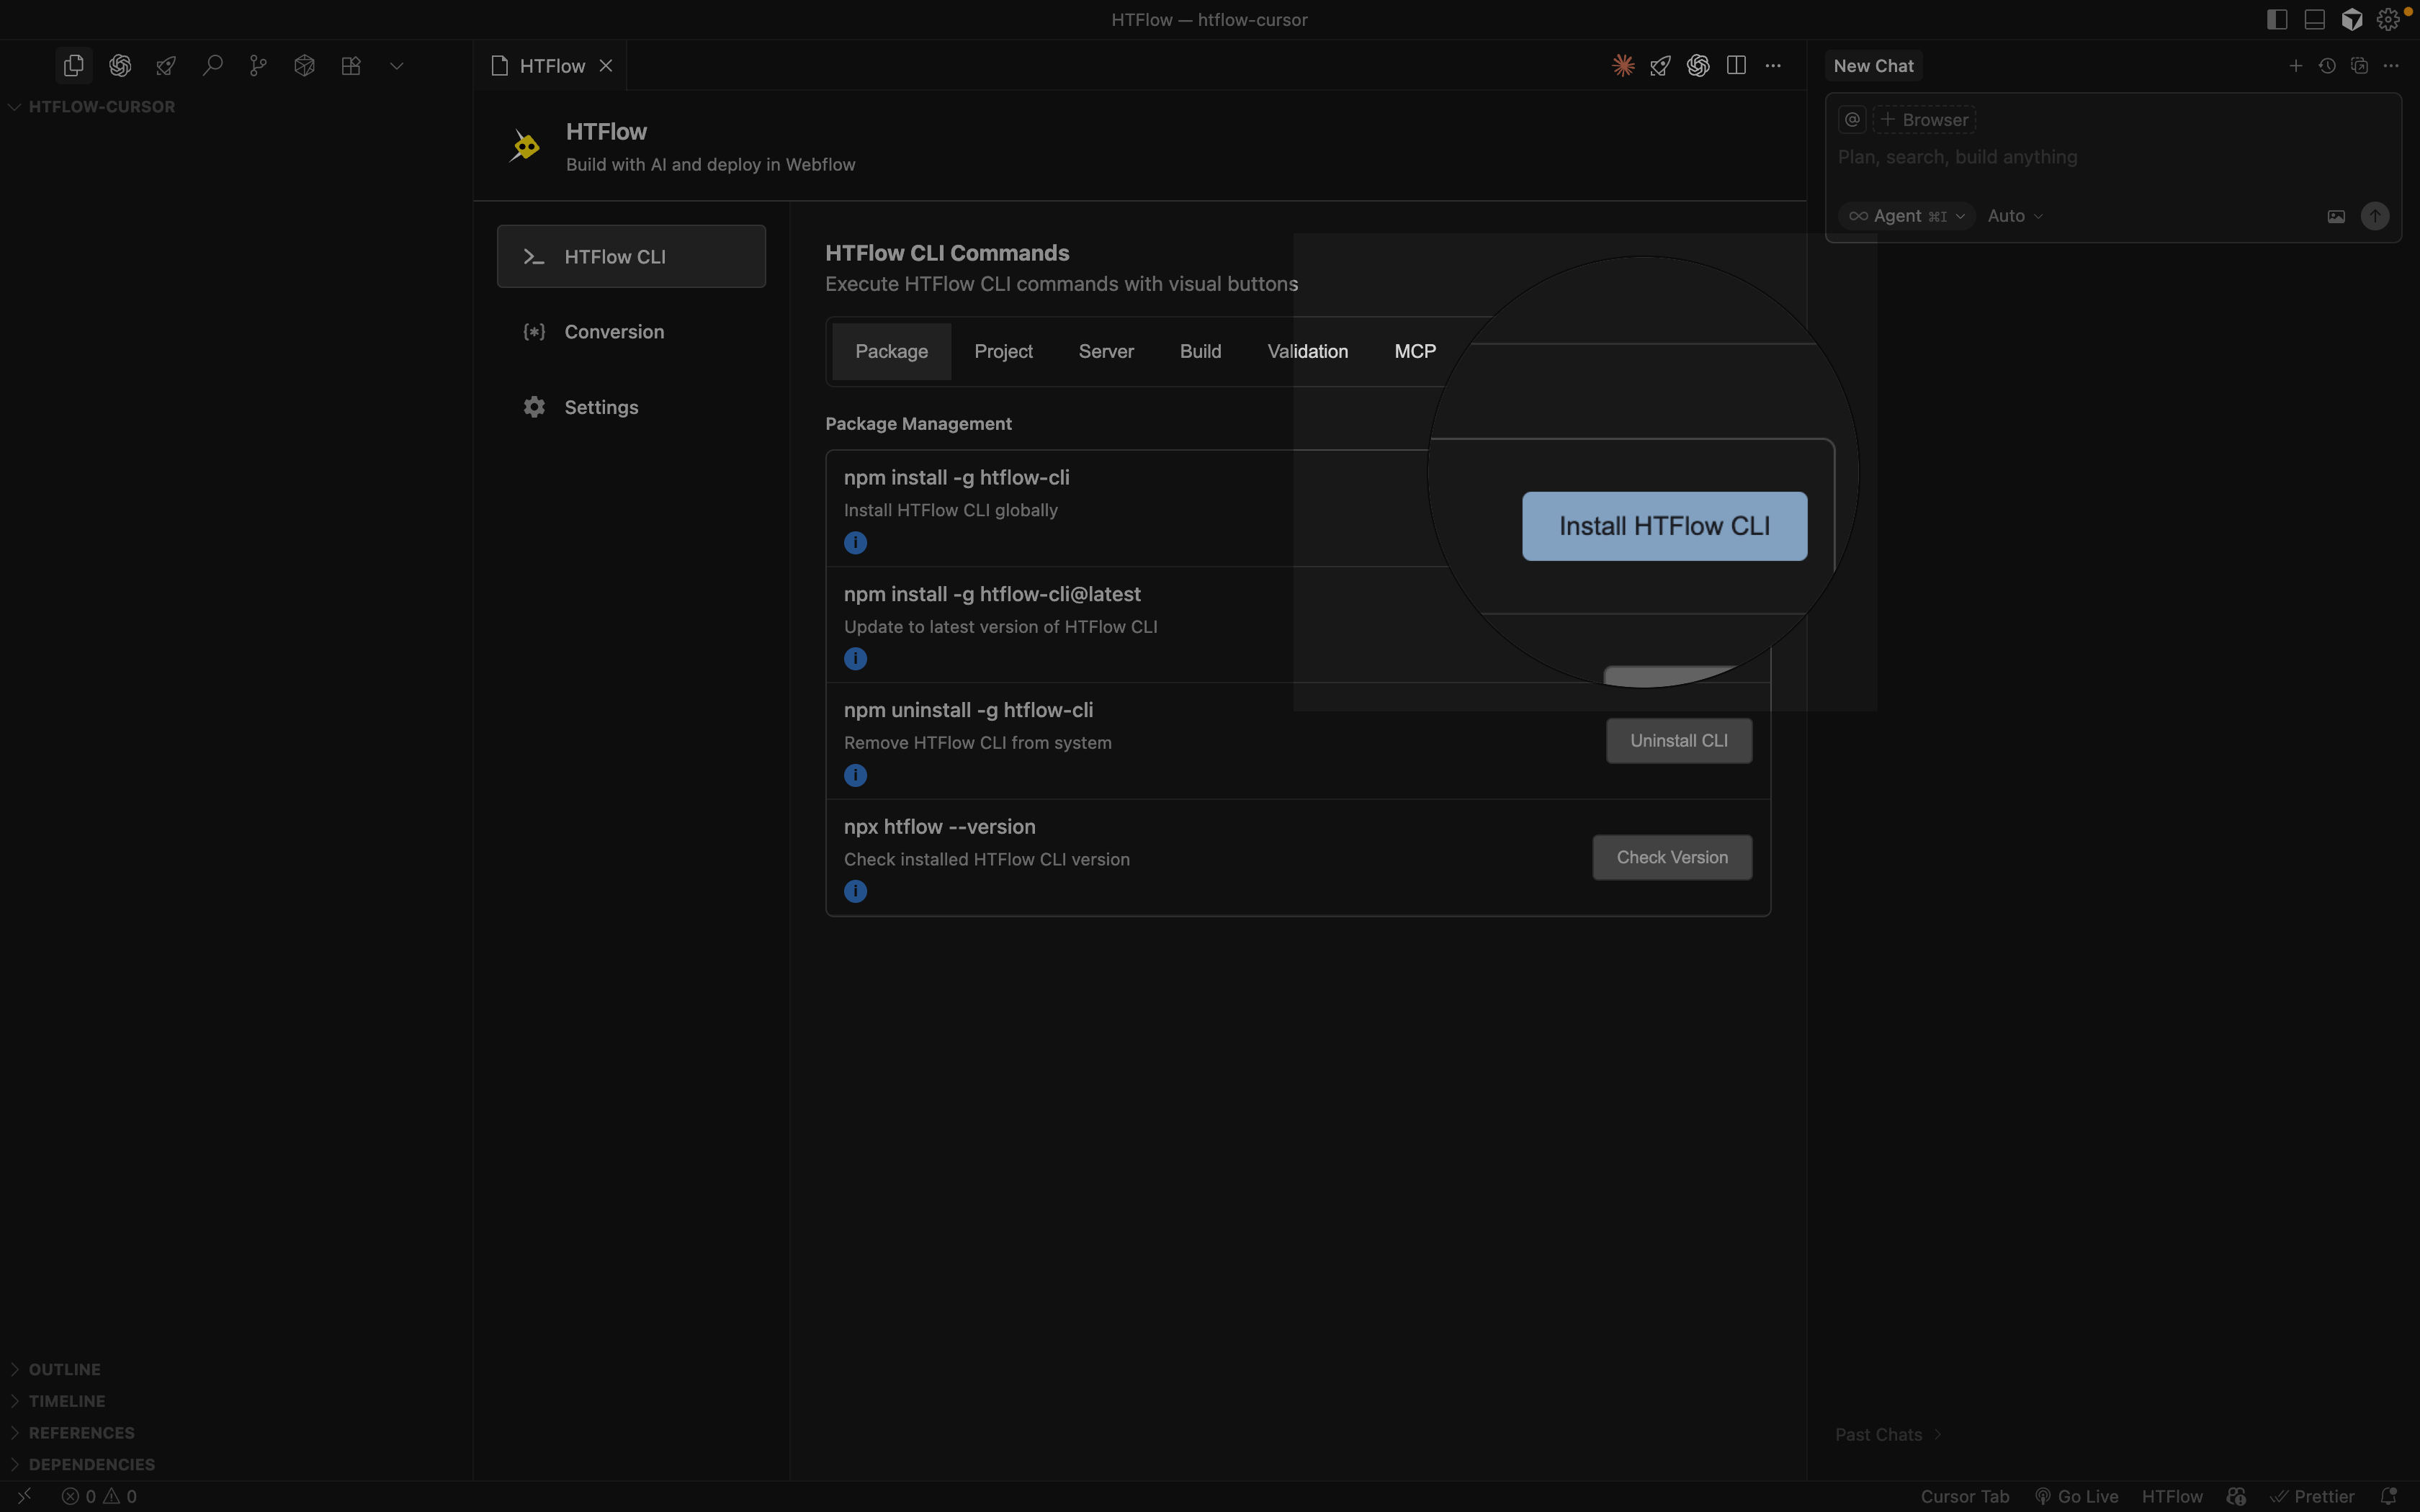
After installing the extension, install the HTFlow CLI:
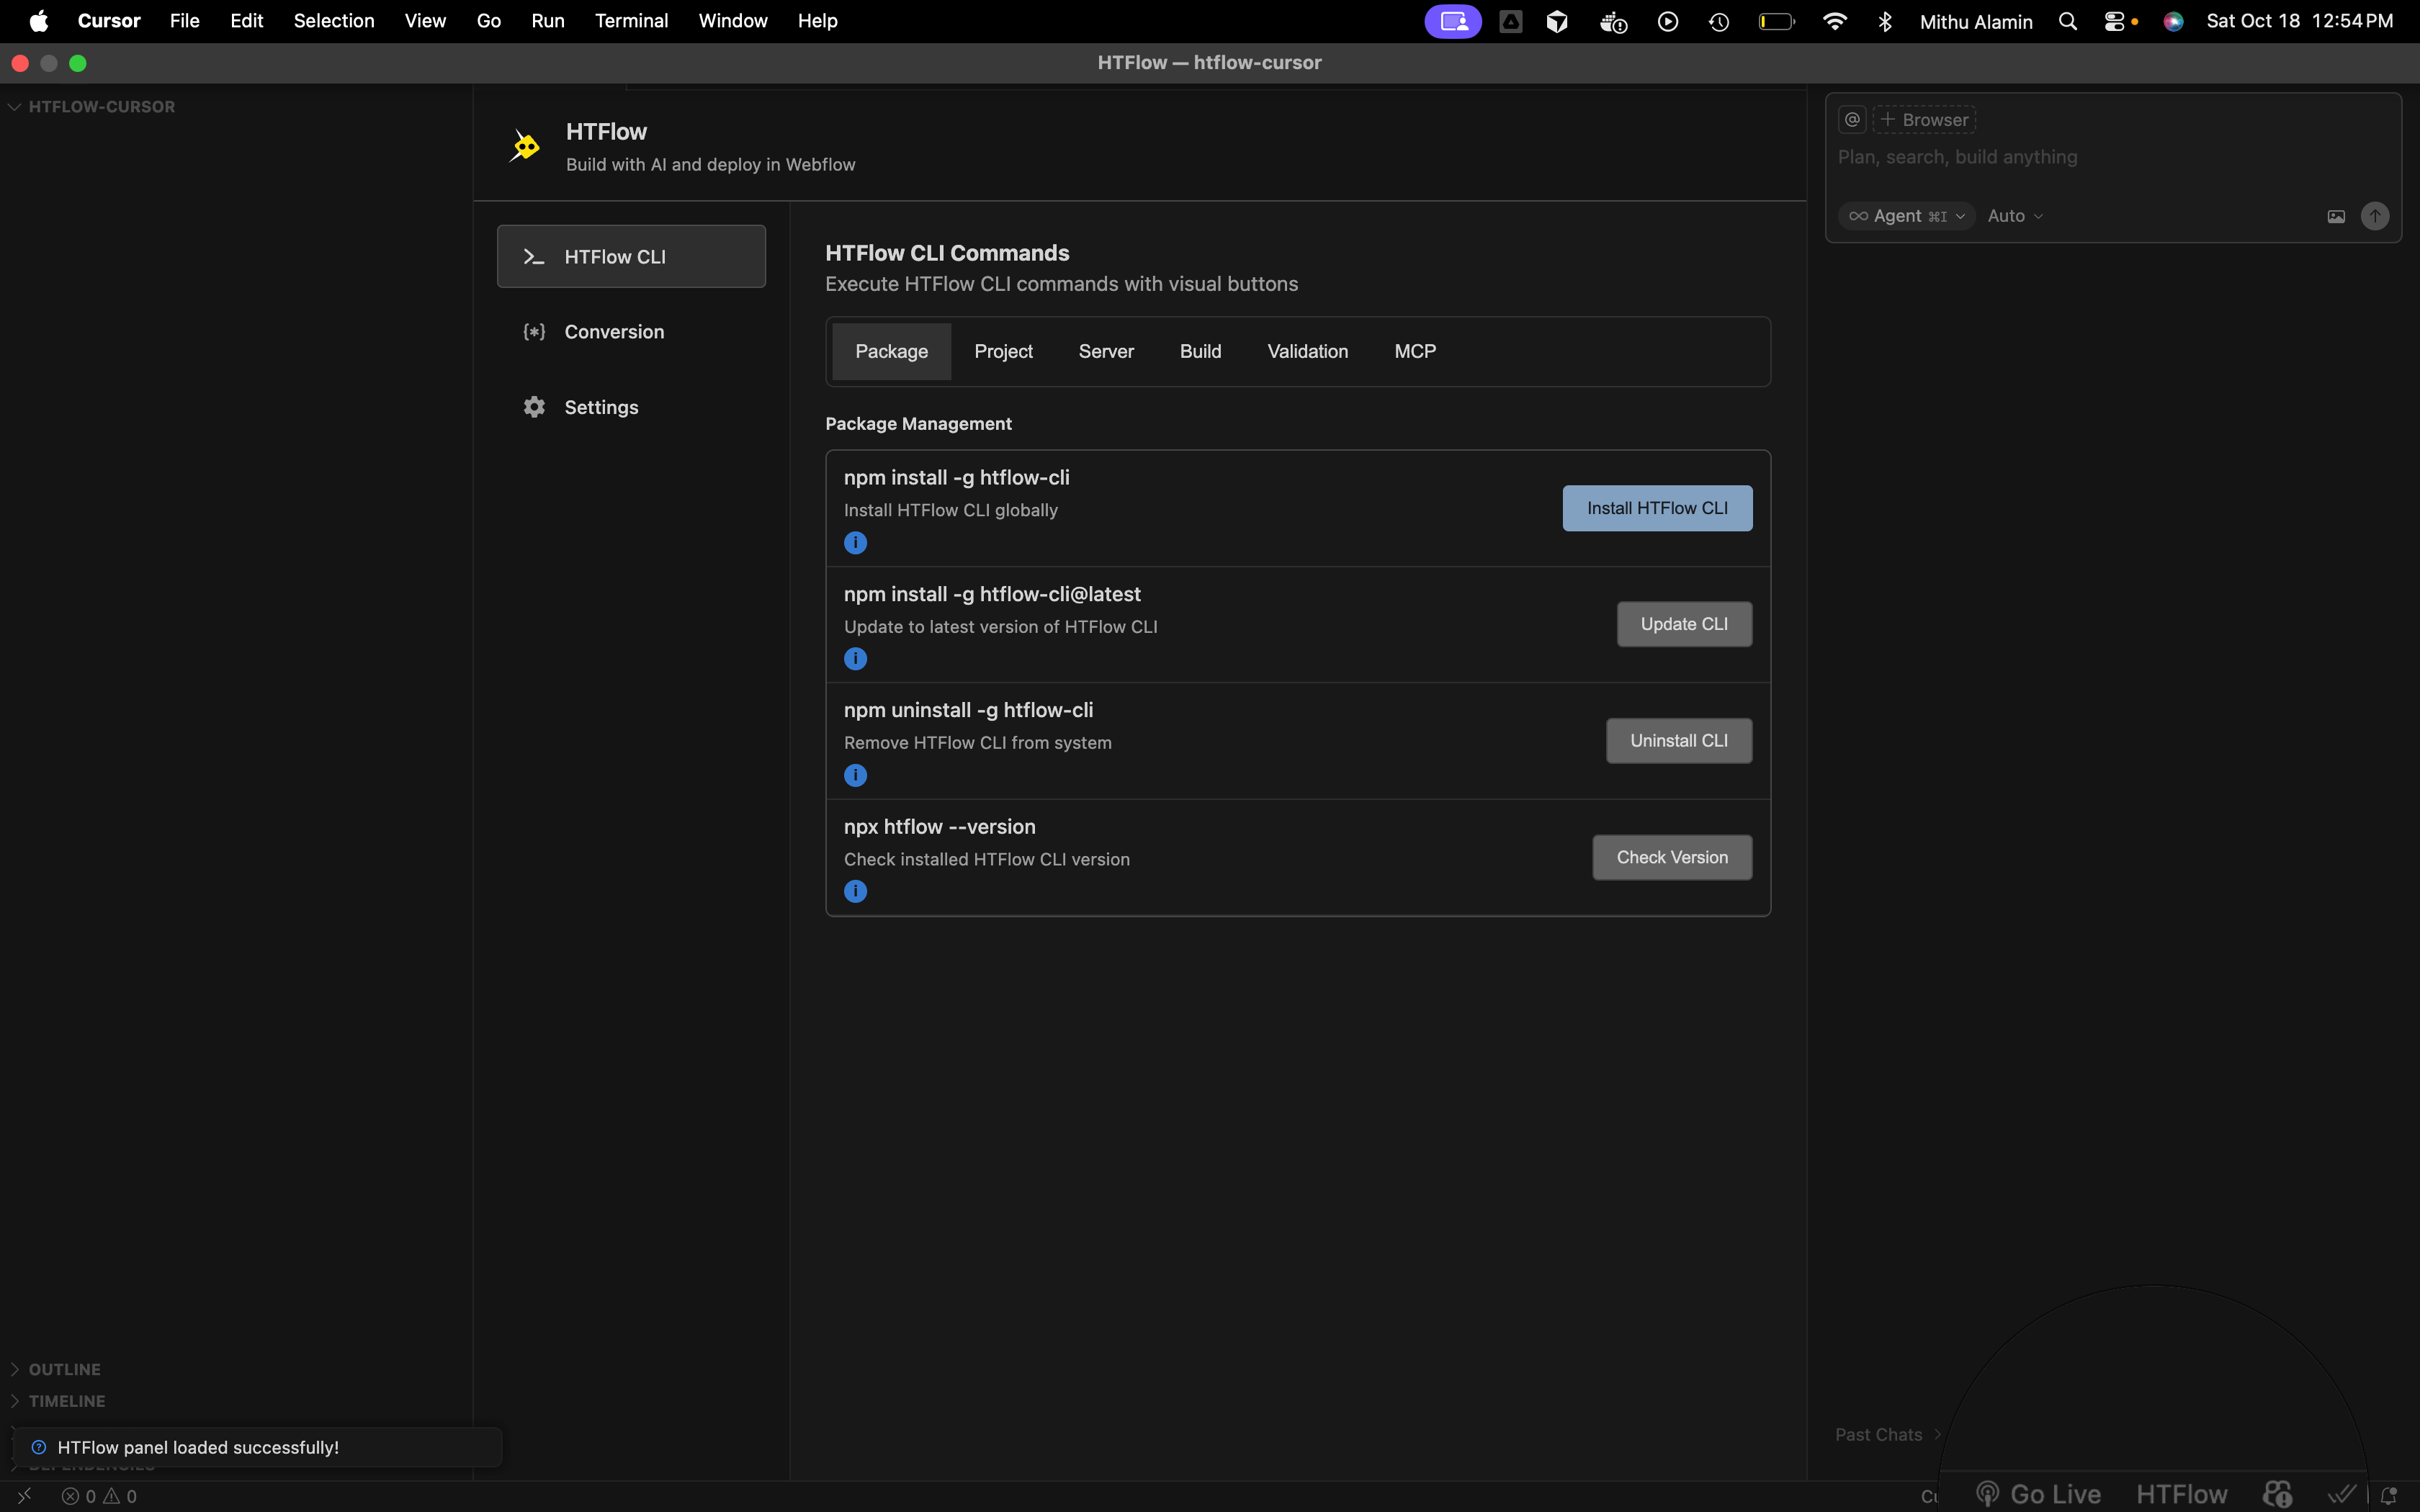
### Step 1: Open HTFlow Panel
Click the HTFlow icon in Activity Bar or press `Ctrl+Shift+H` / `Cmd+Shift+H`
### Step 2: Install HTFlow CLI globally
In the HTFlow panel, click **"Install HTFlow CLI"** button
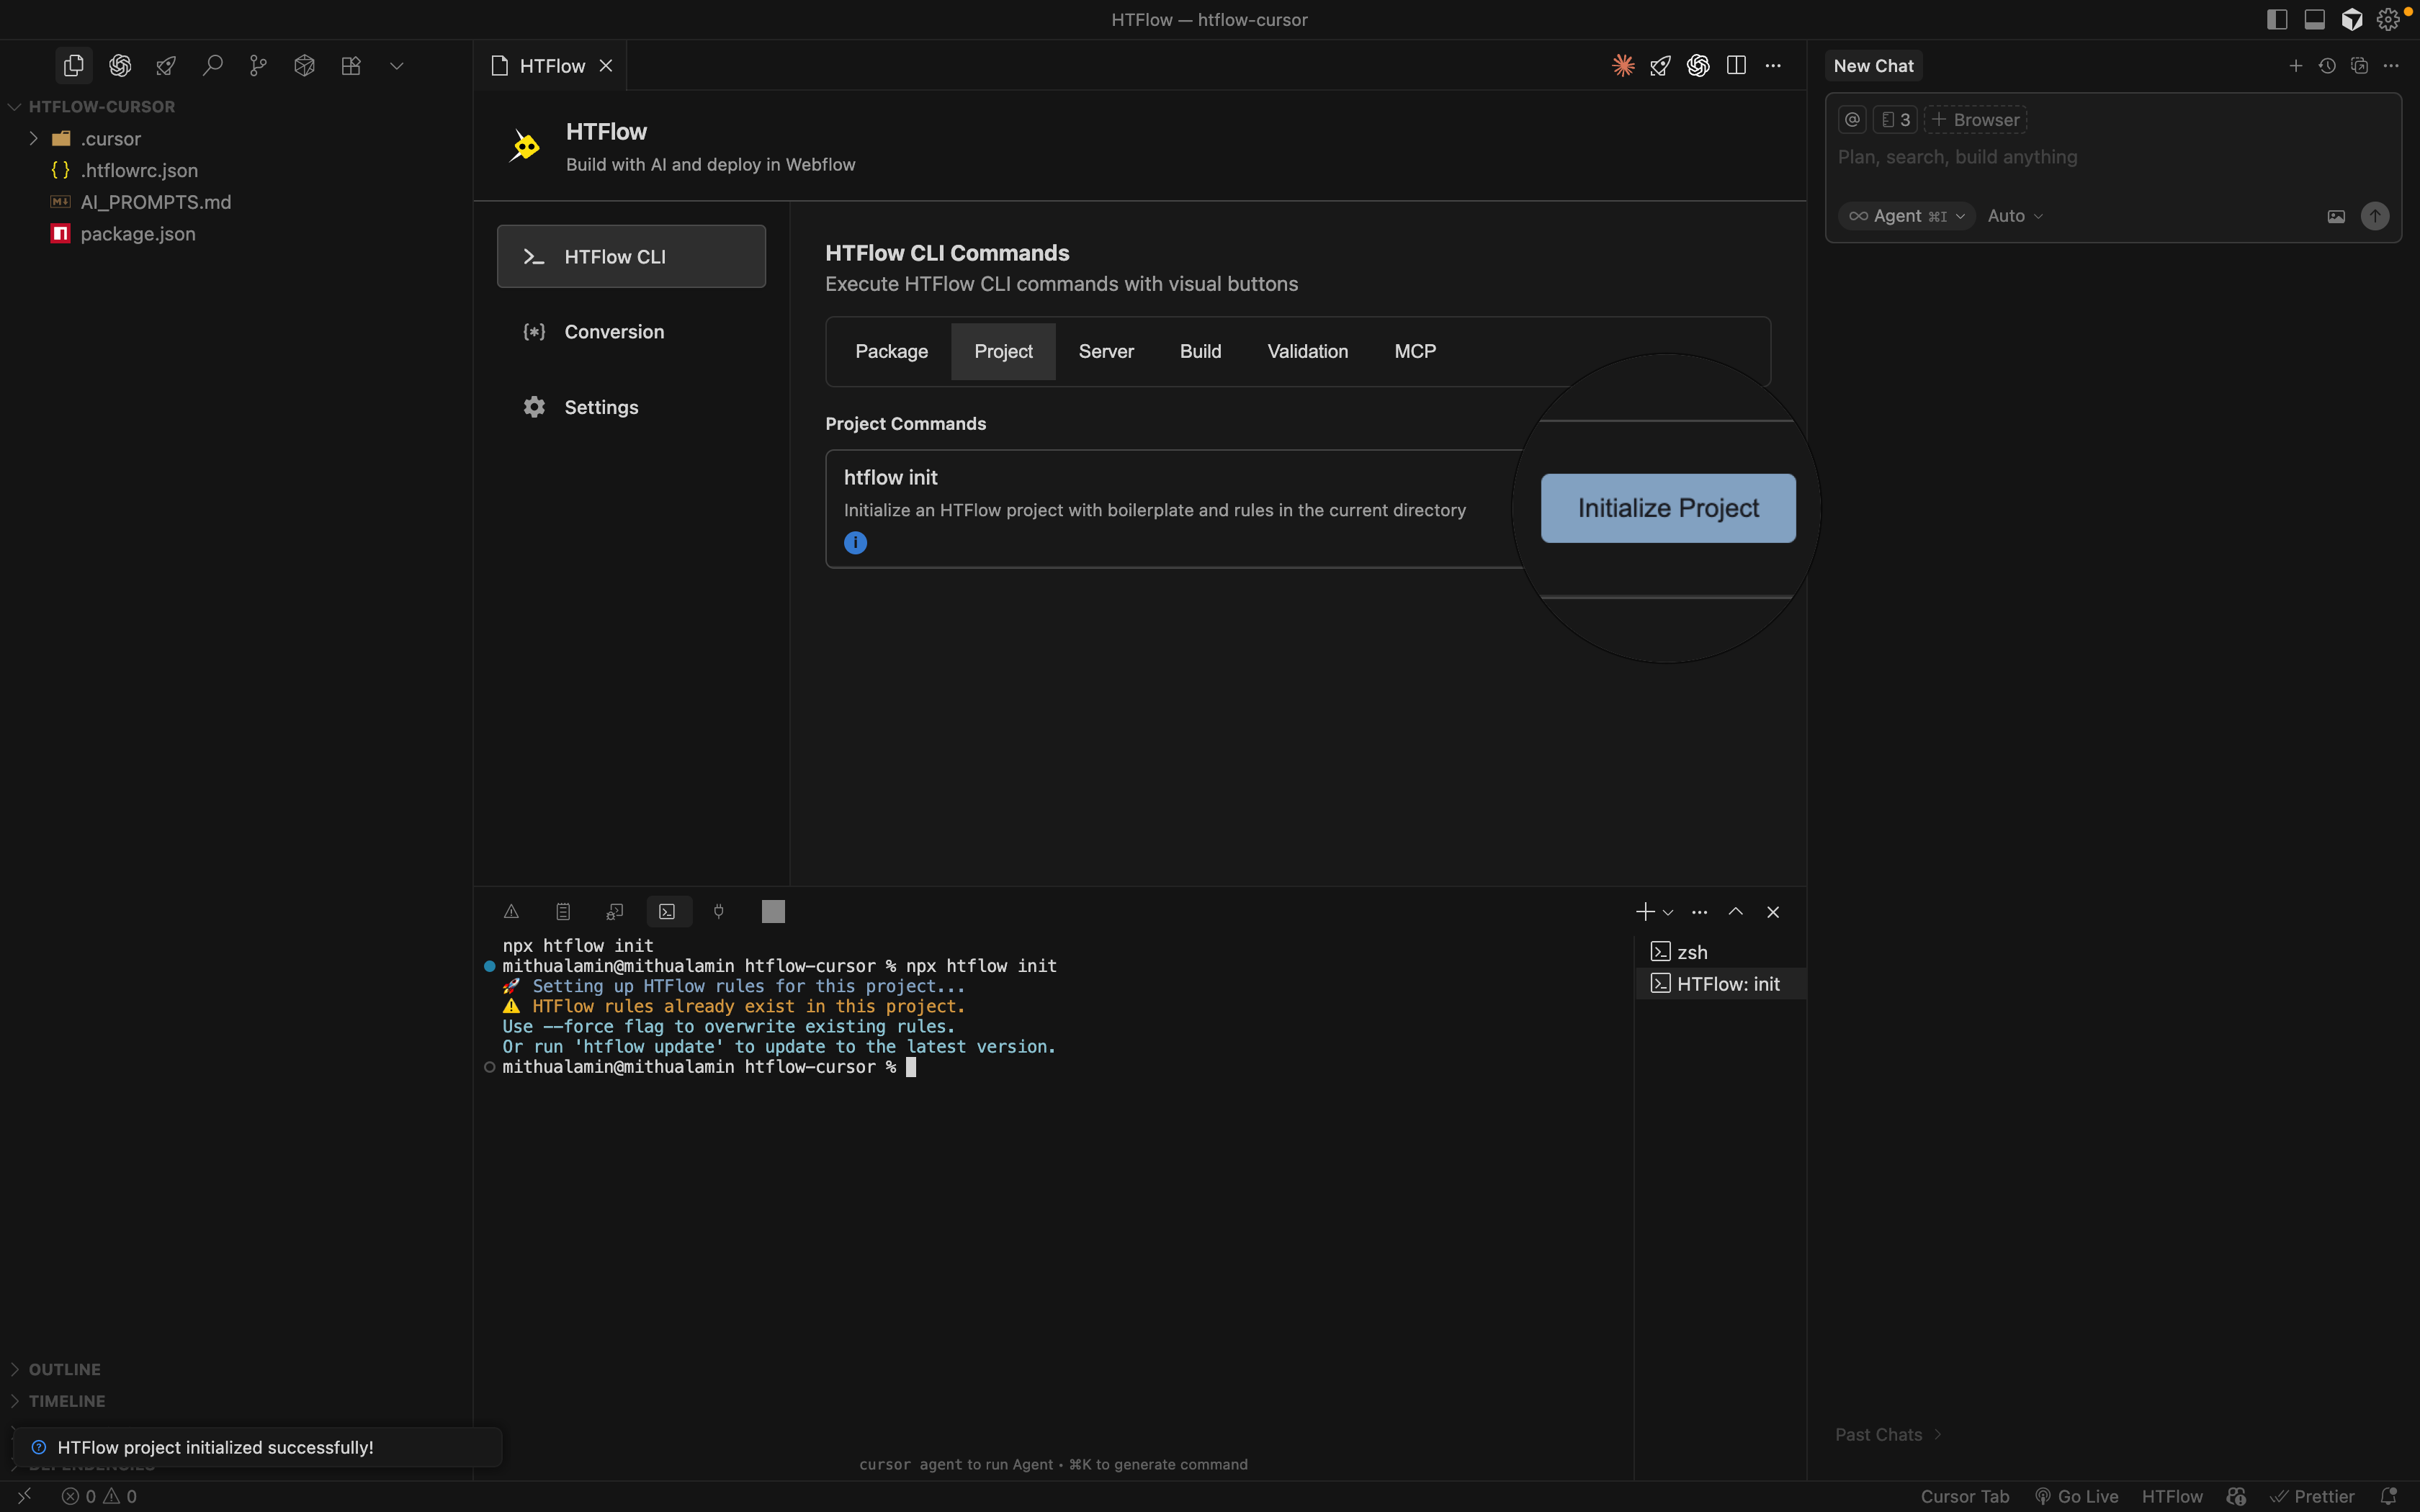
### Step 3: Initialize Project
In the HTFlow panel, click **"Initialize Project"** button
**Project Structure Created:**
After initializing the project, HTFlow will create the following file and folder structure:
```text theme={null}
.cursor/
└── rules/
├── examples/
│ ├── htflow-css-examples.mdc
│ ├── htflow-html-examples.mdc
│ └── htflow-js-examples.mdc
├── htflow-css-essentials.mdc
├── htflow-html-essentials.mdc
├── htflow-js-essentials.mdc
├── .htflowrc.json
└── AI_PROMPTS.md
```
**What Each File Contains:**
* **htflow-html-essentials.mdc**: Essential HTML rules and guidelines for HTFlow compatibility
* **htflow-css-essentials.mdc**: CSS best practices and HTFlow-specific styling rules
* **htflow-js-essentials.mdc**: JavaScript guidelines for HTFlow conversion
* **htflow-html-examples.mdc**: HTML code examples and templates
* **htflow-css-examples.mdc**: CSS examples and styling patterns
* **htflow-js-examples.mdc**: JavaScript code examples
* **.htflowrc.json**: HTFlow configuration file
* **AI\_PROMPTS.md**: Pre-configured prompts for AI agents to generate HTFlow-compatible code
### Step 4: AI Build
Create your HTML webpage using an AI agent. We've shown the default Cursor AI in this example,
but you can use any AI agent you prefer, such as Claude Code, GPT Code, Gemini CLI, or any other AI coding assistant.
**Key Requirements:**
* Instruct your AI agent to follow the HTFlow rules that were established during the project initialization step
* Provide the `.cursor` folder, `htflowrc.json`, and `AI_prompt.md` files as context to your AI agent (Cursor AI or others)
* This ensures the AI agent will generate HTML, CSS, and JavaScript code that is compatible with Webflow and Droip conversion requirements
**Best Practices:**
* Start with a clear description of your website requirements
* Ask the AI to follow the HTFlow rules from the configuration files
* Iterate on the design until you're satisfied with the result
* Save your files before proceeding to the audit step
**Example AI Prompts for HTFlow Development**
```text theme={null}
"Create a modern SaaS landing page using HTFlow-compatible
HTML, CSS, and JavaScript.
Follow ALL HTFlow rules strictly and include the following sections:
**Hero Section:**
- Compelling headline with value proposition
- Subheading explaining the product benefits
- Primary CTA button and secondary button
- Hero image or illustration
- Trust indicators (logos, badges, or stats)
**Product Features Section:**
- 3-4 key features with icons
- Feature titles and descriptions
- Visual elements (icons, images, or graphics)
- Grid layout for feature cards
**Testimonials Section:**
- 3 customer testimonials
- Customer names, titles, and company logos
- Star ratings or review scores
- Professional headshots or avatars
**Pricing Section:**
- 3 pricing tiers (Basic, Pro, Enterprise)
- Clear pricing with currency symbols
- Feature lists for each plan
- CTA buttons for each pricing tier
- Popular plan highlighting
**Call-to-Action Section:**
- Compelling headline
- Urgency or benefit-focused copy
- Primary CTA button
- Supporting text or trust signals
**Footer Section:**
- Company logo and tagline
- Navigation links (About, Features, Pricing, Contact)
- Social media icons
- Copyright and legal links
- Newsletter signup form
**Technical Requirements:**
- Use semantic HTML5 elements
- Implement responsive design (mobile-first)
- Include smooth scrolling and animations
- Add hover effects and micro-interactions
- Ensure accessibility compliance
- Use modern CSS Grid and Flexbox
- Include JavaScript for interactive elements
**HTFlow Compliance:**
- Follow HTFlow HTML, CSS and JavaScript rules inside .cursor folder
**Style Guides:**
-Use a single container acrross the website
-Keep all the similar heading size same accross the website
Make the design modern, professional, and conversion-focused."
```
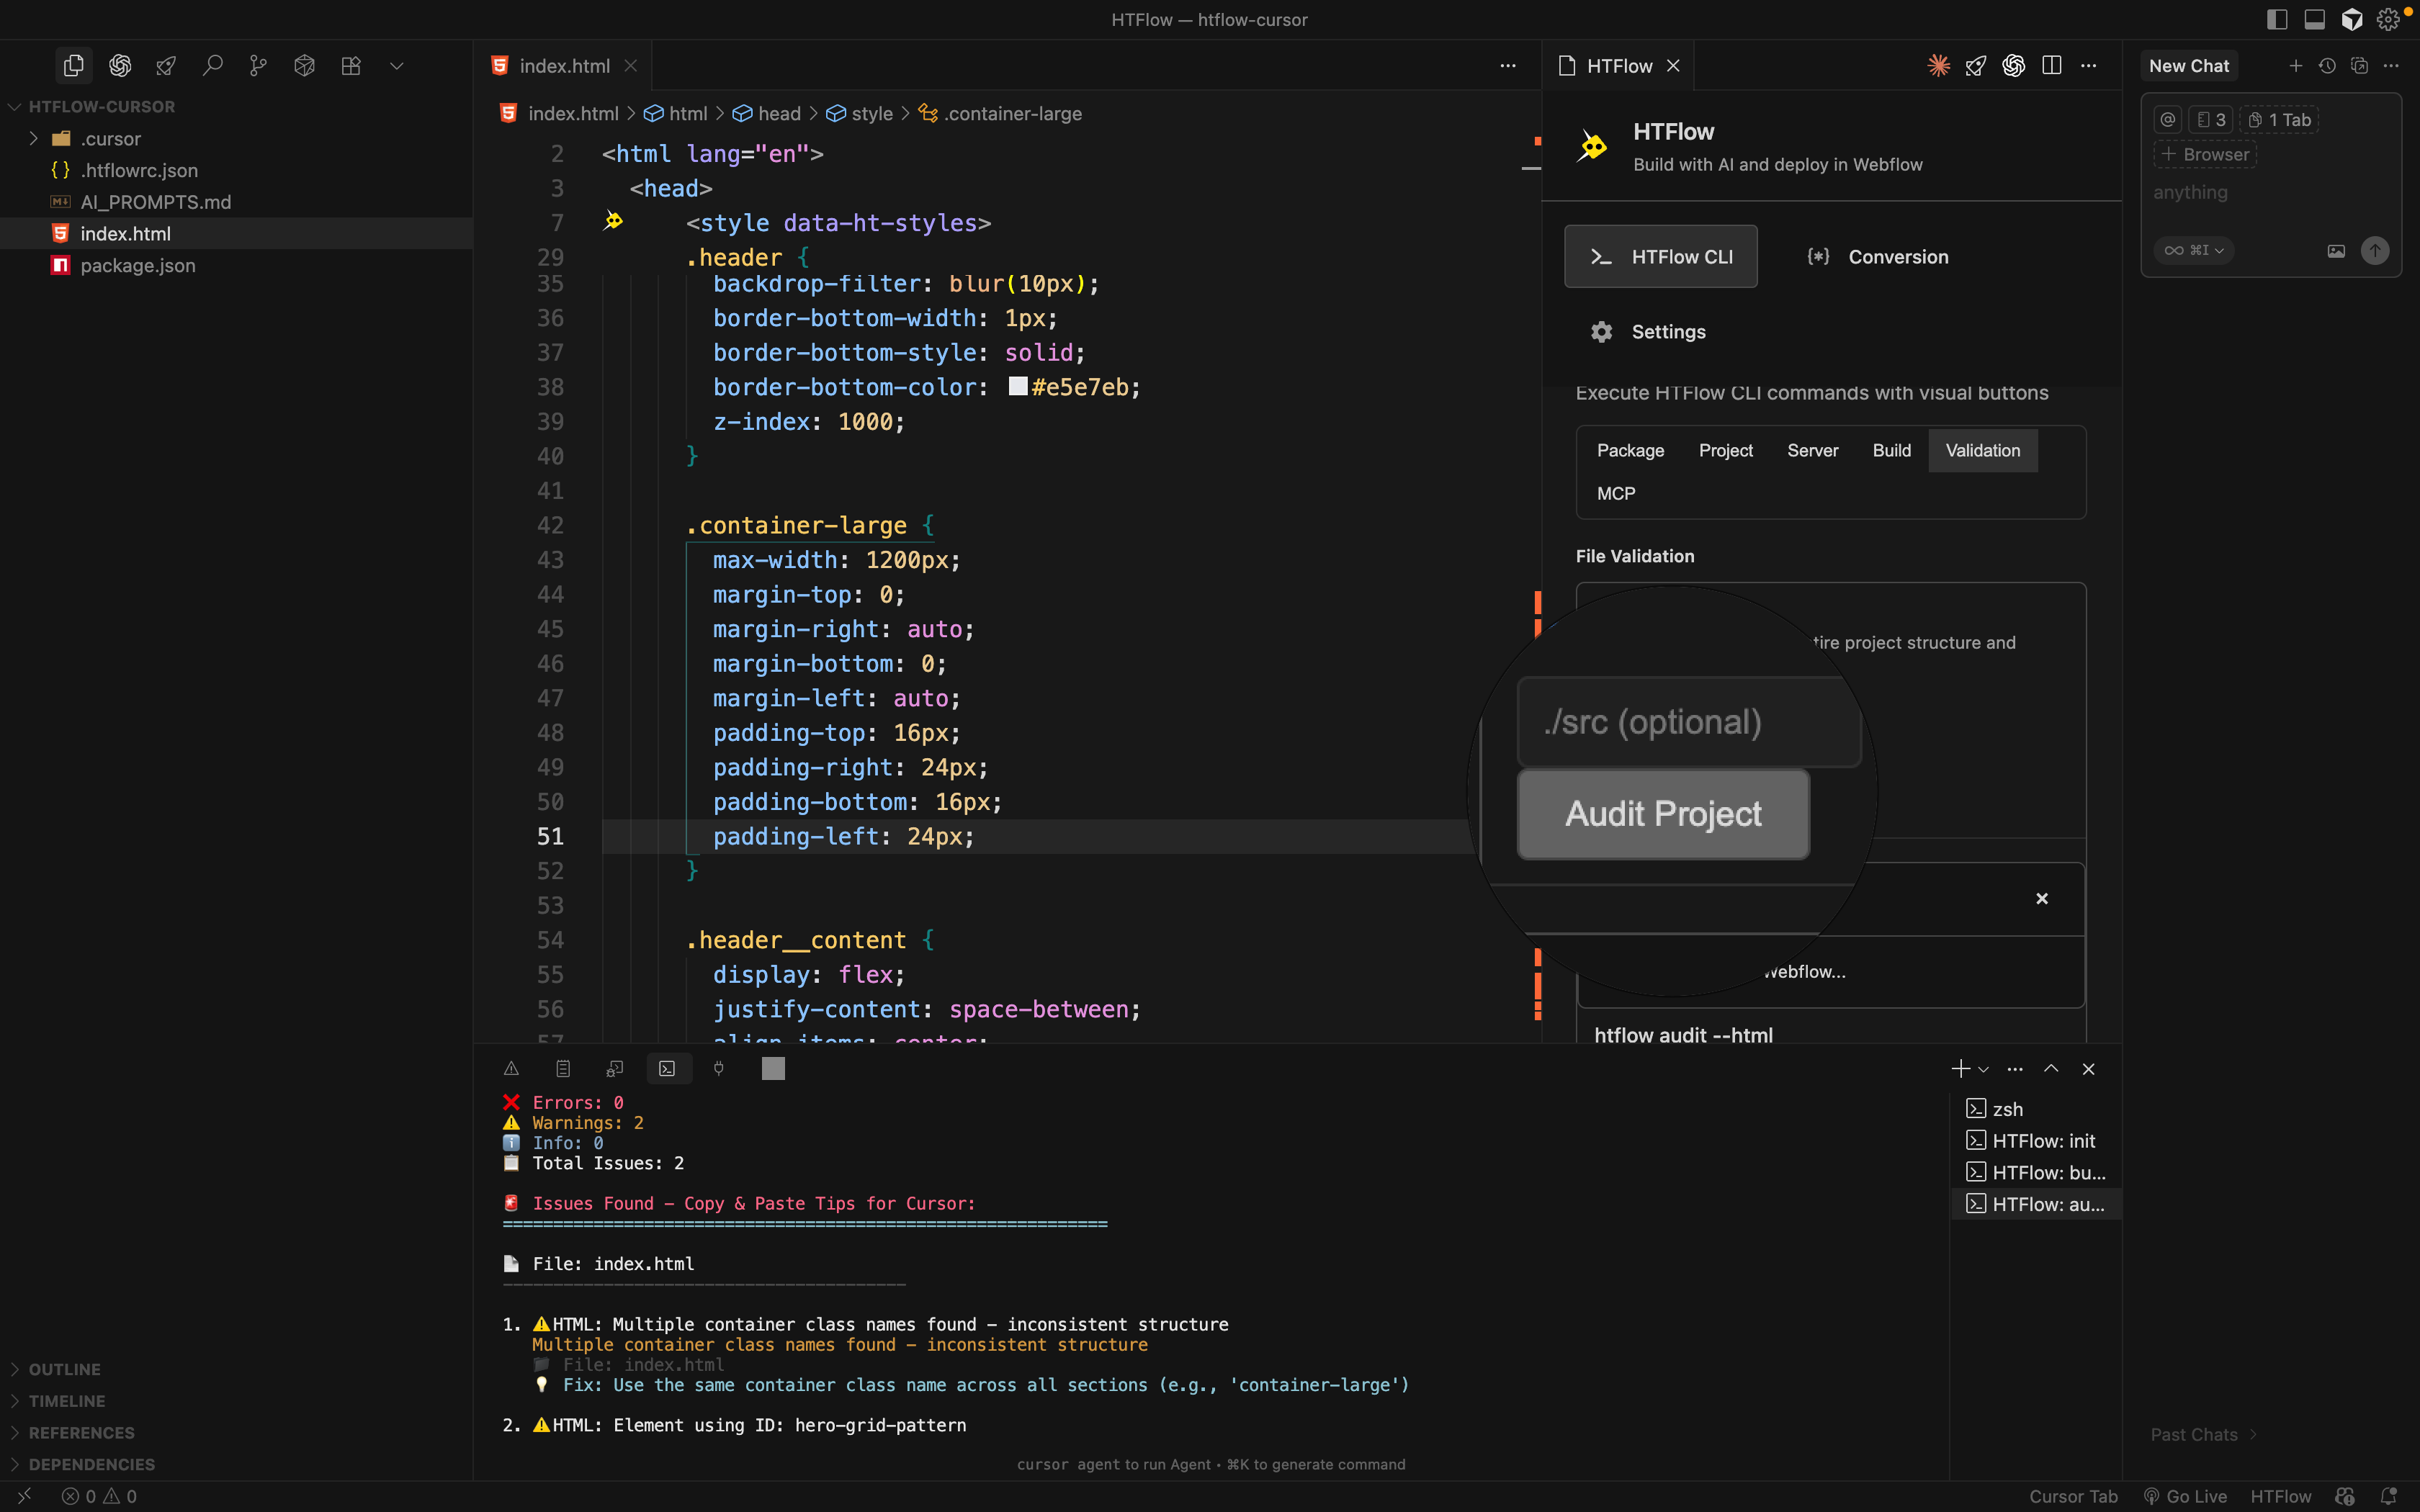
### Step 5: Audit and Validation
Once you're satisfied with your AI-generated design, run the audit to validate your code against HTFlow rules.
In the HTFlow panel, click on the **"Validation"** tab and then click the **"Audit Project"** button.
HTFlow will execute the `npx htflow audit` command in the terminal.
**What the Audit Does:**
* Scans your HTML, CSS, and JavaScript files for rule violations
* Displays all compatibility issues that need to be fixed
* Provides detailed error messages and suggestions
**Fixing Errors:**
If you encounter any errors, simply copy the entire terminal output and paste it into your AI agent's chat box,
asking the AI to fix the issues. The AI will resolve all the errors for you.
You can run the audit repeatedly until you achieve zero errors.
See the complete tutorial to learn how to build a full website with HTFlow from start to finish.
### Step 6: Development Server
In the HTFlow panel, click the **"Server"** tab where you'll see two server options:
* **HTFlow Serve Dev (Development Server)**: For testing and development
* **HTFlow Serve Start (Production Server)**: For final deployment and production use
**Why Use a Development Server?**
The development server is essential for several reasons:
1. **Live Preview**: You can see your website changes in real-time as you develop
2. **Hot Reloading**: Automatic browser refresh when you save files
3. **HTFlow Chrome Extension Integration**: Enables website inspection capabilities
**How It Works:**
When you click the **"Start Dev Server"** button, HTFlow launches a local development server that:
* Serves your website on a local port (typically [http://localhost:3050](http://localhost:3050))
* Enables real-time file watching and automatic reloading
* Provides development-specific features and debugging tools
* Integrates with the HTFlow Chrome extension for enhanced inspection
**Chrome Extension Benefits:**
With the HTFlow Chrome extension installed, development mode provides:
* **Website Inspection**: Analyze your HTML structure and styling
* **AI-Prompt Generation**: Generate prompts for AI agents to improve your design
* **Design Analysis**: Get suggestions for layout and styling improvements
* **Code Optimization**: Identify areas for better performance and compatibility
The HTFlow development server is strongly recommended for development mode, as the HTFlow Chrome extension only functions properly with this server type. This ensures full compatibility and access to all development features.
### Step 7: Production Server
In the HTFlow panel, click the **"Server"** tab where you'll see two server options:
* **HTFlow Serve Dev (Development Server)**: For testing and development
* **HTFlow Serve Start (Production Server)**: For final deployment and production use
**When to Use the Production Server:**
The production server is essential for several reasons:
1. **Final Testing**: Test your website in production-like conditions
2. **Performance Optimization**: See how your site performs with optimized settings
3. **Deployment Preparation**: Ensure your site is ready for live deployment
4. **Conversion Ready**: Prepare for Webflow or Droip conversion processes
**How It Works:**
When you click the **"Start Production Server"** button, HTFlow launches a production server that:
* Serves your website with production-optimized settings
* Enables minification and compression for better performance
* Provides production-specific configurations
* Prepares your site for deployment and conversion
**Production Server Benefits:**
With the production server running, you get:
* **Optimized Performance**: Faster loading times and better resource management
* **Conversion Compatibility**: Ensures compatibility with Webflow and Droip conversion tools
* **Deployment Ready**: Your site is prepared for live deployment
* **Production Testing**: Test your site as it will appear to end users
The production server intentionally disables JavaScript to preserve the original HTML structure.
This ensures compatibility with the HTFlow Chrome Extension
for Webflow and Droip conversion. Please note that in production mode, JavaScript functionality will not work - this is specifically designed for conversion purposes.
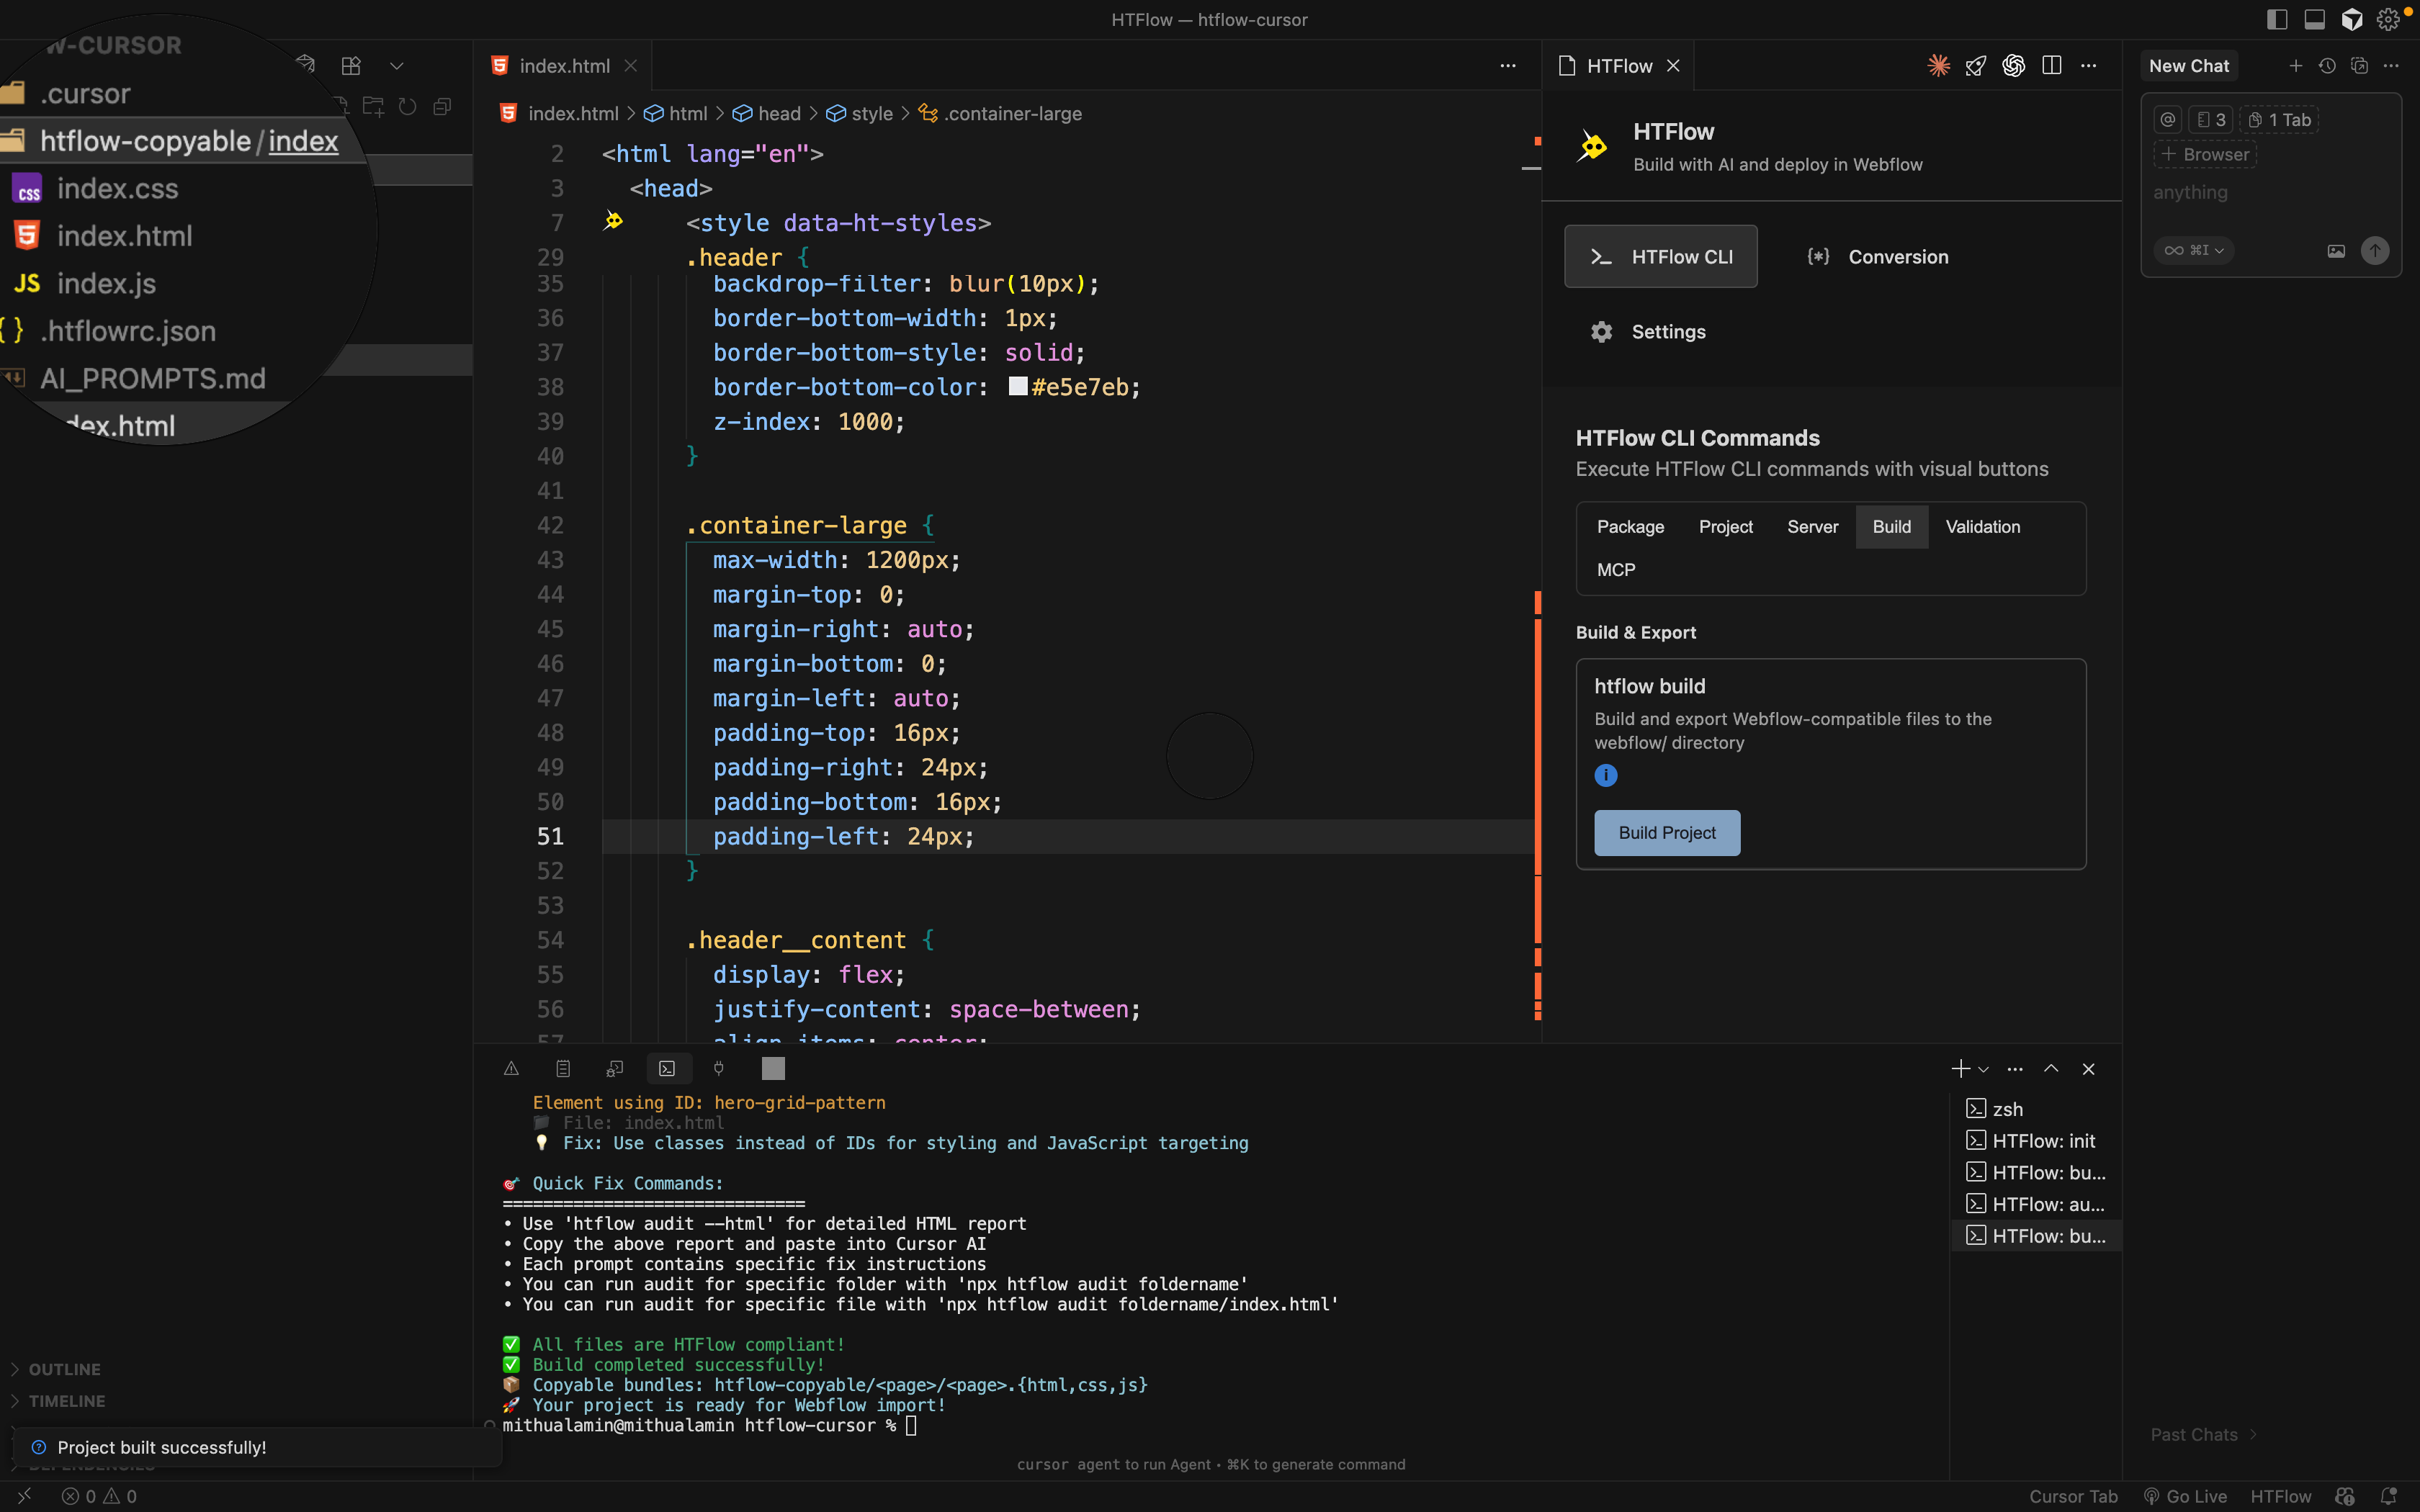
### Step 8: Build for Conversion
In the HTFlow panel, click the **"Build"** tab and then click the **"Build Project"** button.
This will create a folder in your project root called **htflow-copyable** and organize each HTML file
as a separate folder containing the copyable HTML, CSS, and JS codes. These files can be used to convert
into Webflow or Droip using the HTFlow Webflow app or HTFlow web app:
* HTML to Webflow
* HTML to Droip
**Example folder structure after build:**
```text theme={null}
htflow-copyable/
├── index/
│ ├── index.html
│ ├── index.css
│ └── index.js
└── about/
├── about.html
├── about.css
└── about.js
```
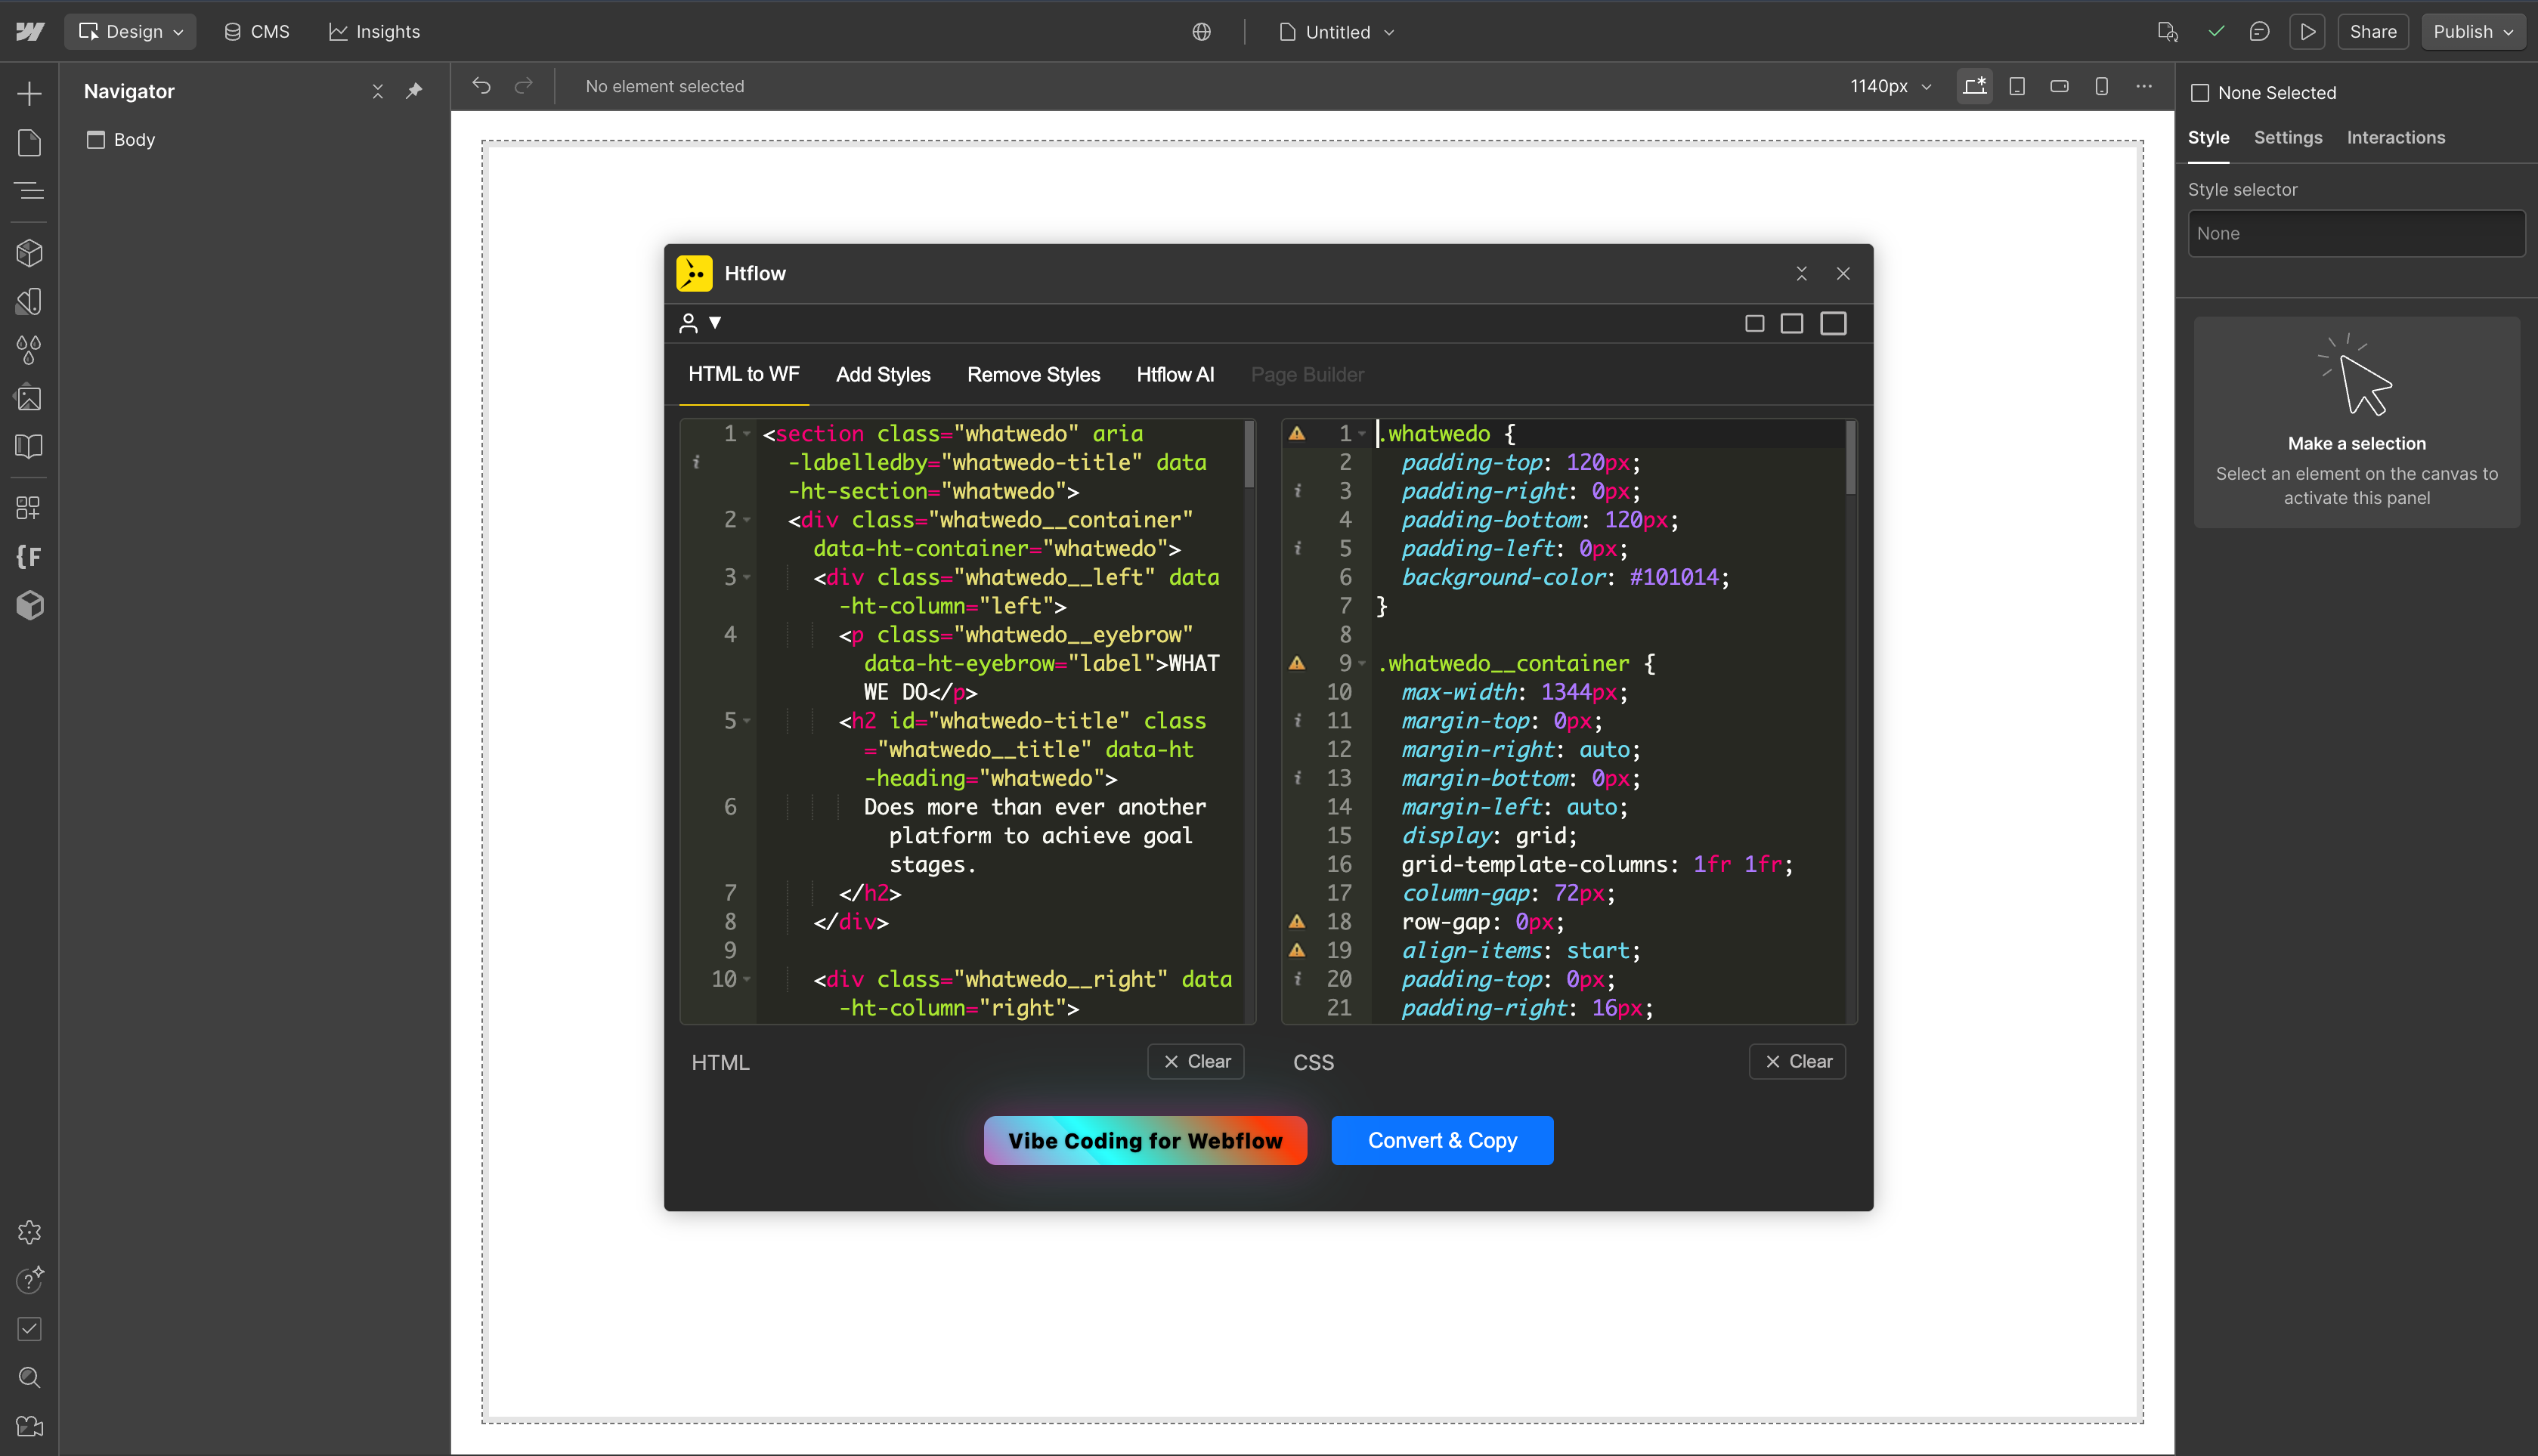
### Step 9: Use Webflow App for Conversion
Once you have your HTML and CSS code ready, you can convert them to Webflow using the **HTFlow Webflow App**.
**How to Use the HTFlow Webflow App:**
1. **Install the App**: Go to your Webflow design canvas and install the **HTFlow** app
2. **Login**: Once you log in to the app, you'll see the **"HTML to WF"** tab
3. **Input Your Code**: The tab contains HTML and CSS input areas:
* Paste your HTML code in the **HTML** area
* Paste your CSS code in the **CSS** area
4. **Convert**: Click the **"Convert & Copy"** button
5. **Paste in Webflow**: Once converted, simply paste into Webflow using:
* **Mac**: `Cmd + V`
* **Windows**: `Ctrl + V`
**Benefits:**
* Seamless conversion from HTML/CSS to Webflow elements
* Preserves styling and layout structure
* Direct integration with Webflow's design canvas
* Maintains responsive design properties
**JavaScript Code Integration:** You need to copy and paste the JavaScript code separately into your Webflow page.
You can do this by either:
* **Page Settings**: Go to your page settings and paste the code in the "Custom Code" area
* **Embed Element**: Add an Embed element to your page and paste the JavaScript code including the `
 **Project Structure Created:**
After initializing the project, HTFlow will create the following file and folder structure:
```text theme={null}
.cursor/
└── rules/
├── examples/
│ ├── htflow-css-examples.mdc
│ ├── htflow-html-examples.mdc
│ └── htflow-js-examples.mdc
├── htflow-css-essentials.mdc
├── htflow-html-essentials.mdc
├── htflow-js-essentials.mdc
├── .htflowrc.json
└── AI_PROMPTS.md
```
**What Each File Contains:**
* **htflow-html-essentials.mdc**: Essential HTML rules and guidelines for HTFlow compatibility
* **htflow-css-essentials.mdc**: CSS best practices and HTFlow-specific styling rules
* **htflow-js-essentials.mdc**: JavaScript guidelines for HTFlow conversion
* **htflow-html-examples.mdc**: HTML code examples and templates
* **htflow-css-examples.mdc**: CSS examples and styling patterns
* **htflow-js-examples.mdc**: JavaScript code examples
* **.htflowrc.json**: HTFlow configuration file
* **AI\_PROMPTS.md**: Pre-configured prompts for AI agents to generate HTFlow-compatible code
**Project Structure Created:**
After initializing the project, HTFlow will create the following file and folder structure:
```text theme={null}
.cursor/
└── rules/
├── examples/
│ ├── htflow-css-examples.mdc
│ ├── htflow-html-examples.mdc
│ └── htflow-js-examples.mdc
├── htflow-css-essentials.mdc
├── htflow-html-essentials.mdc
├── htflow-js-essentials.mdc
├── .htflowrc.json
└── AI_PROMPTS.md
```
**What Each File Contains:**
* **htflow-html-essentials.mdc**: Essential HTML rules and guidelines for HTFlow compatibility
* **htflow-css-essentials.mdc**: CSS best practices and HTFlow-specific styling rules
* **htflow-js-essentials.mdc**: JavaScript guidelines for HTFlow conversion
* **htflow-html-examples.mdc**: HTML code examples and templates
* **htflow-css-examples.mdc**: CSS examples and styling patterns
* **htflow-js-examples.mdc**: JavaScript code examples
* **.htflowrc.json**: HTFlow configuration file
* **AI\_PROMPTS.md**: Pre-configured prompts for AI agents to generate HTFlow-compatible code